Attaching Wisp solar panels
Just documenting assembly and attachments of the Solar panels for posterity. Note, a few of these steps are out of order at present. They will be corrected as I get good photos. The antenna should be done first, and attached prior to the Solar panel work.
Cut a piece of wire to 2.75". Bend as illustrated.
Place a piece of tape across the back of the circuit board (as insulation) and then another piece of tape on the cross-piece to secure it lightly. Note that later taping will secure the panels more firmly.
Note that the cross piece is secured about 1/8" below the two solder pads on the left of the board, near the center. Those are the solar power attachment points.
The supercap was left off in this illustration to allow a better view.
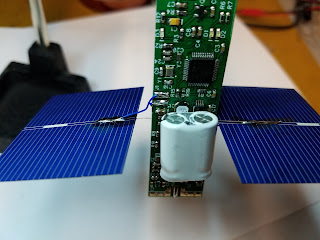
This is the board with supercap installed. Note the supercap is soldered in place, but not secured too much yet. The tape used to secure the antenna would normally help stabilize the supercap.
Tin the backs and fronts of the solar panels as shown. I use a bit of liquid flux, and then swipe a very "wet" iron across the pad. Do not hold heat on the panels for long. They'll crack.
The right hand panel is soldered BELOW the cross-piece.
The left hand panel is soldered ABOVE the cross-piece.
This is basically wiring the panels in series.
The positive wire is soldered to the bottom of the right hand panel, and secured to the lower solar pad on the board.
The negative wire is attached to the top of the left panel, and then to the upper solar pad on the board.
Rear view, showing the positive wire coming across the back of the board, and attaching to the lower solar pad.
Finished product, shown with antenna attached.
This page will be updated as I get better photos and can document the procedure in order.


